目标
node 安装
linux 安装命令:以node 6.x, debian 为例
curl -sL https://deb.nodesource.com/setup_6.x | sudo -E bash -
(如果未安装 curl 请先安装 curl: sudo apt-get update sudo apt-get install curl )
sudo apt-get install -y nodejs
初始化工程
1、终端(console)进入工程目录,例如: ~/Documents/koa2-start/,输入 命令 npm init
2、根据提示填写工程名称(name), 版本(version), 描述(description), 入口文件(entry point), 测试命令(test command), git仓库(git repository), 关键字(keywords), 作者(author),license。最后 Is this ok?(yes) 输入yes。此时可以发现在当前目录下生成了一个名为 package.json 的文件,这个文件可以管理整个应用的依赖文件,启动命令等。
3、新建入口文件 app.js
4、进入package.json文件配置启动命令: 在scripts 字段添加启动工程命令:
2
3
”start": "node --harmony app.js"
}
在终端输入命令: npm start 即可node 运行脚本 app.js
工程搭建
一、最小工程
安装依赖: npm install –save koa@2
代码编写:使用 async/await
2
3
4
5
6
7
8
9
10
11
12
13
14
15
const app = new Koa()
app.use(async (ctx, next) => {
try {
await next();
} catch (err) {
ctx.body = { message: err.message }
ctx.status = err.status || 500
}
})
app.use(async ctx => {
ctx.body = 'feifeiyu'
})
app.listen(3000, () => console.log('server started, port 3000'))
module.exports = app
async/await是异步流程控制最新的解决方案,还是属于ES7的提案, node 暂未支持,需要使用babel转码后使用
babel配置:a、安装依赖 npm install –save-dev babel-plugin-syntax-async-functions babel-plugin-transform-async-to-generator babel-preset-es2015 babel-preset-es2015-node6 (根据node版本选择) babel-register
b、新建文件 .babelrc ,加入babel配置
2
3
4
5
6
7
"presets": ["es2015-node6"],
"plugins": [
"transform-async-to-generator",
"syntax-async-functions"
]
}
c、 新建文件 index.js, 配置babel入口
2
require("./app.js");
- d、 修改启动入口文件为index.js, 进入package.json,将“start” 启动参数设置为 “node –harmony index.js” e、 **终端启动服务: npm start, 本机访问: localhost:3000, 在浏览器中可以看见返回结果为 feifeiyu
使用co
a、 从上例看出sync/await 虽然好用,但需要配置一大堆babel文件, 接下来使用co来充当 Generator函数的执行器, co教程
b、引入依赖 npm install –save co
c、改写上例代码
2
3
4
5
6
7
8
9
10
11
12
13
14
15
16
const co = require('co')
const app = new Koa()
app.use(co.wrap(function* (ctx, next) {
try {
yield next();
} catch (err) {
ctx.body = { message: err.message }
ctx.status = err.status || 500
}
}))
app.use(co.wrap(function* (ctx) {
ctx.body = 'feifeiyu'
}))
app.listen(3000, () => console.log('server started, port 3000'))
module.exports = app
d、 修改启动入口文件为index.js, 进入package.json,将“start” 启动参数改回 “node –harmony app.js”
e、 终端启动服务: npm start, 本机访问: localhost:3000, 在浏览器中可以看见返回结果同样为 feifeiyu,
f、 采用co 模块可以避免babel转码而产生大量难以阅读的代码,更有利于代码调试。 本文介绍的koa2将主要基于co模板实现异步流程控制。
二、nunjucks模板渲染
在服务端渲染网页需要使用相应的模板文件,对于node来说,比较流行的有jade, 但是这个对于前端来说不够直观, 没有html文件的那种亲切感,而且学习适应成本高。因此综合考虑可以使用类似Django模板的 nunjucks模板引擎。
a、安装依赖: 在此,我们选择支持koa2的nunjucks中间件: koa-nunjucks-promise
b、nunjucks配置:
2
3
4
5
6
7
8
9
10
11
12
13
14
app.use(nunjucksViews(`${__dirname}/views`, { //配置模板文件路径,例如:模板文件统一置于工程根目录的view文件夹中
ext: 'html', //渲染文件后缀为 html
noCache: true, //开发环境下不设置缓存
watch: true, //开发环境下观察模板文件的变化并更新,方便开发
filters: { //过滤器
json: function(str) {
return JSON.stringify(str, null, 2)
}
},
globals: { //设置对于nunjucks的全局变量
// staticPath: '//static'
}
}))
c、根据以上配置,我们先在工程根目标建一个views文件夹, 在文件夹下新建一个模板文件index.html
d、模板文件编写
2
3
4
5
6
7
8
9
10
11
12
13
14
<html lang="zh-CN">
<head>
<meta charset="utf-8">
<meta http-equiv="X-UA-Compatible" content="IE=edge">
<meta name="viewport" content="width=device-width, initial-scale=1">
<!-- 上述3个meta标签*必须*放在最前面,任何其他内容都*必须*跟随其后! -->
<title>{{ title }}</title> <!-- 页面标题,变量值由渲染时传入 -->
</head>
<body>
<p>{{ content }}</p> <!-- 页面内容,内容变量值值由渲染时传入 -->
</body>
</html>
e、页面渲染, 加入一下代码
2
3
4
//index表示views/index.html, title 对应模板文件中的title, content 对应 content
yield ctx.render('index', {title: 'Nunjucks', content: 'Feifeiyu yeah!'})
}))
f、整体代码:
2
3
4
5
6
7
8
9
10
11
12
13
14
15
16
17
18
19
20
21
22
23
24
const co = require('co')
const nunjucksViews = require('koa-nunjucks-promise')
const app = new Koa()
//-----------------------
app.use(nunjucksViews(`${__dirname}/views`, { //配置模板文件路径,例如:模板文件统一置于工程根目录的view文件夹中
ext: 'html', //渲染文件后缀为 html
noCache: true, //开发环境下不设置缓存
watch: true, //开发环境下观察模板文件的变化并更新,方便开发
filters: { //过滤器
json: function(str) {
return JSON.stringify(str, null, 2)
}
},
globals: { //设置对于nunjucks的全局变量
// staticPath: '//static'
}
}))
app.use(co.wrap(function* (ctx) {
yield ctx.render('index', {title: 'Nunjucks', content: 'Feifeiyu yeah!'})
}))
//-----------------------------
app.listen(3000, () => console.log('server started, port 3000'))
module.exports = app
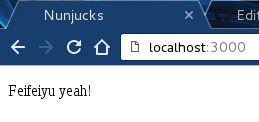
g、在终端输入 npm start 启动服务, 浏览器中访问 localhost:3000, 即可见页面标题变为 Nunjucks, 文本内容为 Feifeiyu yeah!
三、koa2路由
对于一个web应用,需要管理大量的url路径,因此需要一个中间件去管理每个url,将对应的请求交给相对应的程序去处理,对于koa2可以使用koa-router去管理/分发每个请求
koa-router支持的http请求类型有: get, post, patch, put, delete。
a、安装依赖: npm install –save koa-router@next
b、对上面代码进行编辑。 目标:根据路由访问模板文件
2
3
4
5
6
7
8
9
10
11
12
13
14
15
16
17
18
19
20
21
22
23
24
25
const co = require('co')
const nunjucksViews = require('koa-nunjucks-promise')
const router = require('koa-router')
const app = new Koa()
const route = new router() //新建路由对象
app.use(nunjucksViews(`${__dirname}/views`, { //配置模板文件路径,例如:模板文件统一置于工程根目录的view文件夹中
ext: 'html', //渲染文件后缀为 html
noCache: true, //开发环境下不设置缓存
watch: true, //开发环境下观察模板文件的变化并更新,方便开发
filters: { //过滤器
json: function(str) {
return JSON.stringify(str, null, 2)
}
}
}))
//---------------------------
route.get('/', co.wrap(function* (ctx) { //根路径
yield ctx.render('index', {title: 'Nunjucks', content: 'Feifeiyu yeah!'}) //渲染nunjucks模板
}))
app.use(route.routes()) //使用路由
.use(route.allowedMethods())
//---------------------------
app.listen(3000, () => console.log('server started, port 3000'))
module.exports = app
c、本例的表现结果与nunjucks模板渲染那一例完全相同, 浏览器访问 localhost:3000 返回 Feifeiyu yeah!
b、假如要新加一个路由 /route/test, http请求类型为 get, 浏览器访问后,返回结果: ‘feifeiyu nuaa’. 在上述例子中加入如下代码
2
3
ctx.body = 'feifeiyu nuaa' //直接在返回的body内打入字符串
}))
d、重启系统 => 浏览器访问: localhost:3000/route/test, => 浏览器中显示 ’feifeiyu nuaa’;
四、静态文件服务
web工程中静态文件路径用于存放 js脚本, 图片等静态资源, 可以通过浏览器直接访问
a、 koa2 静态文件配置需要用到两个依赖, 分别是中间件 koa-static: 开启静态服务的中间件, 将工程中的某一路径设置为静态文件路径; koa-mount: 挂载静态文件的中间件,用于将静态文件夹挂载于某一url路径; npm install –save koa-static@next koa-mount@next
b、 在工程根目录新建路径/public, 用于存放静态文件
c、 在app.js文件中加入代码配置代码, **注意: 静态文件路径配置代码一定要放在 模板配置之后(即放置于nunjucks配置之后)
2
3
4
5
6
7
8
9
10
11
12
13
14
15
16
17
18
19
20
21
22
23
24
25
26
const co = require('co')
const nunjucksViews = require('koa-nunjucks-promise')
const mount = require('koa-mount')
const server = require('koa-static')
const app = new Koa()
app.use(nunjucksViews(`${__dirname}/views`, { //配置模板文件路径,例如:模板文件统一置于工程根目录的view文件夹中
ext: 'html', //渲染文件后缀为 html
noCache: true, //开发环境下不设置缓存
watch: true, //开发环境下观察模板文件的变化并更新,方便开发
filters: { //过滤器
json: function(str) {
return JSON.stringify(str, null, 2)
}
},
globals: { //设置对于nunjucks的全局变量
// staticPath: '//static'
}
}))
//----------------------------------
//在模版引擎配置之后
//将./public路径配置为静态路径,并将 ./public路径挂载到 名为/static的url路径
app.use(mount('/static', server(`${__dirname}/public`))) //设置静态文件路径
//----------------------------------
app.listen(3000, () => console.log('server started, port 3000'))
module.exports = app
d、 在静态路径 ./public 加入一个镜头文件(js, css, img等),例如图片: koa.png
e、 启动服务, 浏览器访问 http://localhost:3000/static/koa.png, 浏览器中即可看见我们在public中添加的图片。
五、总结
至此,一个简单的 koa web 应用已经搭建完成,
a、工程目录结构如下:(不考虑babel配置)
2
3
4
5
6
| ├──node_modules #依赖文件目录,这个目录不用建, 由npm install 安装依赖后自动生成
| ├──public #静态文件目录
| ├──views #模板文件目录
| ├──app.js #服务入口
| └──pakage.json #
a、 app.js 文件整合后:
2
3
4
5
6
7
8
9
10
11
12
13
14
15
16
17
18
19
20
21
22
23
24
25
26
27
28
29
30
31
32
const co = require('co')
const nunjucksViews = require('koa-nunjucks-promise')
const router = require('koa-router')
const mount = require('koa-mount')
const server = require('koa-static')
const app = new Koa()
const route = new router()
app.use(nunjucksViews(`${__dirname}/views`, { //配置模板文件路径,
ext: 'html', //渲染文件后缀为 html
noCache: process.env.NODE_ENV === 'development', //开发环境下不设置缓存
watch: process.env.NODE_ENV === 'development', //开发环境下观察模板文件的变化并更新
filters: { //过滤器
json: function(str) {
return JSON.stringify(str, null, 2)
}
},
globals: { //设置对于nunjucks的全局变量
// staticPath: '//static'
}
}))
app.use(mount('/static', server(`${__dirname}/public`))) //设置静态文件路径
route.get('/', co.wrap(function* (ctx) {
yield ctx.render('index', {title: 'Nunjucks', content: 'Feifeiyu yeah!'})
}))
app.use(route.routes())
.use(route.allowedMethods())
route.get('/route/test', co.wrap(function* (ctx) {
ctx.body = 'feifeiyu nuaa'
}))
app.listen(3000, () => console.log('server started, port 3000'))
module.exports = app
在pakage.json中引入的依赖:
2
3
4
5
6
7
8
"co": "^4.6.0",
"koa": "^2.0.0",
"koa-mount": "^2.0.0",
"koa-nunjucks-promise": "^1.0.3",
"koa-router": "^7.0.1",
"koa-static": "^3.0.0"
}